
One of the most frustrating moments in a driver’s life is when, after turning the ignition, there’s nothing but silence (unless you’re driving an electric car, then that’s not a problem). The familiar engine sound does not come, and there’s no neighbour around to help, and the whole morning schedule is ruined. The situation can be terrifying in the moment, but the solution to the issue is really simple – all it takes is to get yourself a good car battery charger.
How to charge your car battery – step by step
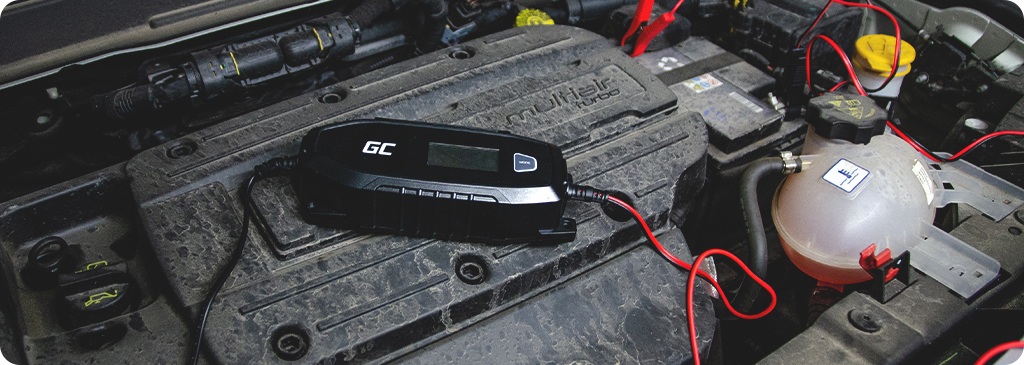
This step by step instruction on charging your car battery is presented on the example of the intelligent Green Ceel 6/12 V 4 A rectifier.

This model enables diagnostics and charging using both 6 V and 12 V of voltage, and even regeneration of completely depleted batteries, as well as operation at temperatures below 0° Celsius thanks to the ColdAGM mode. It is adapted to charging many car battery types, e.g. AGM, EFB, MF, SLA, VRLA, WET, Gel-based, Acid-Lead batteries, and LiFePO₄.
CONNECTING
To start with, ensure the proper working conditions. Make sure the location is dry and safe. If everything is alright, you can start charging.
1. The first step is disconnecting the battery from the car, or other vehicle or device. As an example, let’s use a car battery.
Disconnect the clamp on the negative terminal (black), then on the positive terminal (red).
2. Then, connect the charger clamps – the red clamp with a + symbol to the red terminal, and the black clamp to the negative one.
3. When connected properly, you can plug the charger to a power source.
4. Select the charging mode on the rectifier, depending on the battery type and temperature which you’re workin in.
5. Wait – depending on the size of your battery, the time to fully charge can range from several minutes to as much as 30 hours in the case ofvery large batteries (e.g. for trucks). It’s worth mentioning that, thanks to the Green Cell charger, this time can be significantly shorter than in the case of less advanced rectifiers.
6. If all you need is a partial charge, just to be on your way soon, then about an hour of charging should suffice, since while driving, the battery will charge itself using the alternator. If, however, you are not traveling far, it’s a good idea to give the charger some more time, since the car battery might not get to sufficiently recharge, and you’ll go through the same process once again on your next attempt to start the car.
DISCONNECTING
1. Begin by disconnecting the rectifier from the power source.
2. Remove the clamp from the negative terminal (black), then from the positive one (red).
3. Re-connect the car’s wiring to the proper battery terminals – first red, then black.
4. Start the car and enjoy the sound of your engine ready for a ride.
Charging of smaller batteries
In the case of other devices, the procedure is exactly the same – you need to match the colors/terminals and the changing mode. A huge advantage of an intelligent charger is its versatility – you can use it both with large car batteries, as well as very small ones, e.g. for toys.
Of course, if you only need a rectifier for smaller batteries, you don’t need to buy equipment this sophisticated. To charge smaller, 2 V and 6 V models, it’s completely sufficient to use a compact charger with charging parameters of 0.6 A or 1 A. In the case of such rectifiers, you can also charge various battery types – AGM, gel-based, as well asWet, MF and EFB. Equipped with the right, universal rectifier, you are fully prepared for any discharged car battery.